Sunday, May 26, 2013

Beachy Desk + Chair

Last summer I collected a bunch of pieces from garage sales and neatly stacked them in a storage room in my basement (to be forgotten).  I can't keep justifying buying more pieces if I already have a room full.  So I started to dig into it and found this desk.
I am pretty sure I paid $2 for it.  The top had veneer that was bubbling a little.  I was going to try to potentially fix it with some glue, but you can see on the left of the photo above I was able to stick a putty knife under it pretty easy so I removed it.
The wood underneath was so much more interesting than the veneer which almost looked like laminate.  There were a few spots that just wouldn't come off and I wound up sanding them off.  Actually I used the sander on it and the heat from it melted the glue and the pieces fell off.  

The wood was marked up either from me taking the veneer off or just not being the best condition prior to getting veneered.  I thought it looked like barn wood or drift wood.  After I sanded it smooth I looked up the recipe to stain it to get that grey weathered wood look.  I went by what both Bell Jar Vintage and Addicted 2 Decorating wrote about.


I used a 0000 steel wool pad and put it in a container with apple cider vinegar and waited a day.  I brushed the solution on and it turned a darker brown.  I remembered that I was supposed to use brewed tea so I brushed that on next. It took a few hours, but the wood turned a nice weathered grey color.


I painted the base of it with two coats of Federal Blue SafePaint (milk paint) from The Old Fashioned Milk Paint Company.  It doesn't chip off as it is meant to be used on walls.  I distressed it and the combo of the blue paint and wood color looked so beachy to me--which I love.


I always like to have a chair to go with a desk and I had this one I got from the trash last year that was also stacked in my storage room.  I painted it with two coats of DIY chalk paint in white.

I wanted to make a seat that I could cover with fabric, but since the chair was not meant to have one, the seat is curved so when I put the wood on top there was a gap and you could see the holes from the caning. 

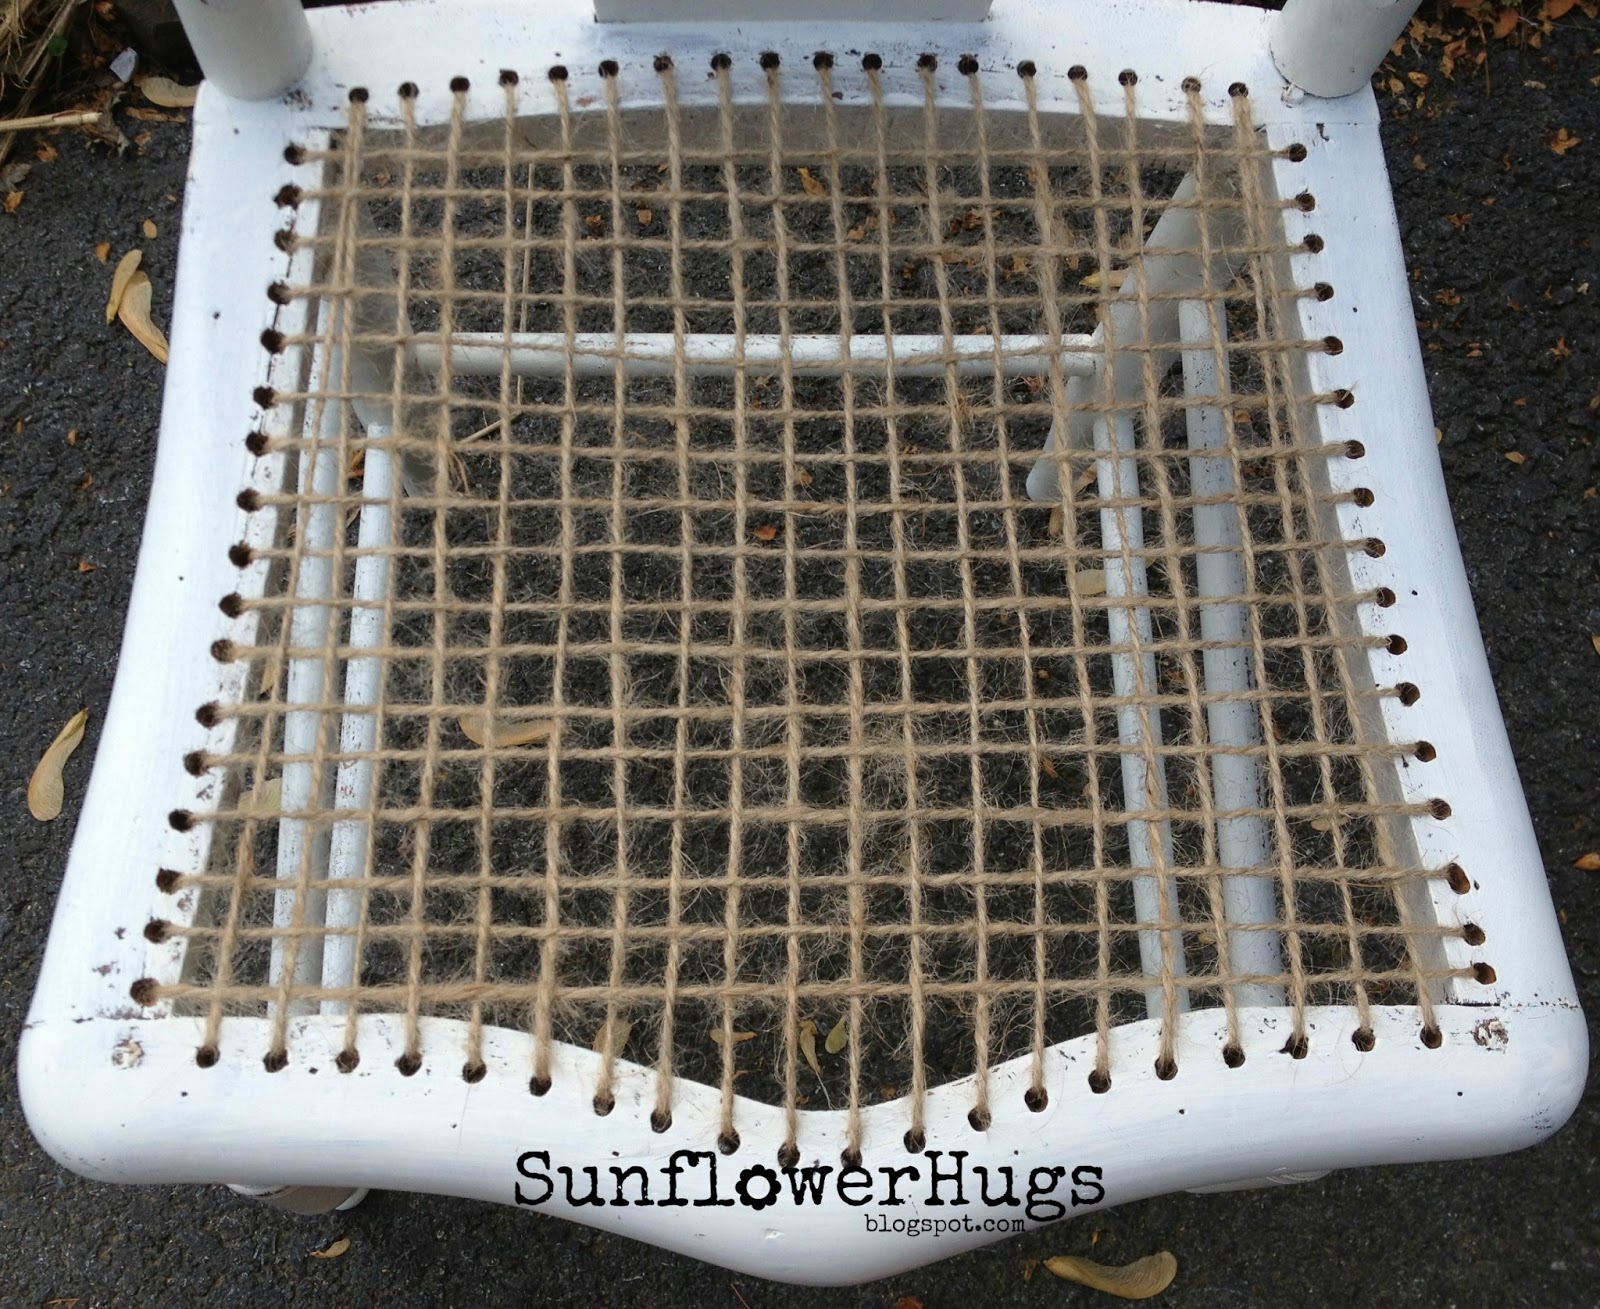
After some thought, I moved on to plan b and got out my jute rope and started weaving it through the holes.  I had to pull it out twice and start over, but was able to create a basket weave somewhat like the original cane seat.  It took about an hour to do.  I sat on it a bunch of times to make sure it will hold and it is strong!  I wouldn't recommend standing on it as I am sure it will break, but so would (did) the cane.

I thought it came out pretty cool!  My original intention was still to cover it with fabric, but I didn't know how to get around the back of the chair, so I left it.
In the end I think the combo of the natural jute and weathered wood and the paint is really cool and has such a beachy vibe.

Linking to:
I Heart Naptime | Silver Pennies | Craft-O-Maniac | Dwellings | I Should Be Mopping The Floor | Homemaker On A Dime | Life On Lakeshore Drive | Classy Clutter | Coastal Charm | Better With Age | Cozy Little House | My Uncommon Slice of Suburbia | Lolly Jane | Today's Creative Blog | Kammy's Korner | PJH Designs | twelveOeight | Kathe With An E | Elizabeth & Co. | Hickory Trail | The Winthrop Chronicles | Not Just A Housewife | Love Bakes Good Cakes | If It's Not Baroque... | The DIY Dreamer | Savvy Southern Style | Fluster Buster | Southern Lovely | Real Housewives of Riverton | Mom On Timeout | Saving 4 Six | Beyond The Picket Fence | A Creative Princess | House Of Hepworths | The Shabby Creek Cottage | All Things With Purpose | Lamberts Lately | I Gotta Create | Miss Mustard Seed | Crafty Scrappy Happy | The Shabby Nest | A Peek Into My Paradise | Funky Junk | Too Much Time On My Hands | Fox Hollow Cottage | Thrifty Decor Chick | Lilyfield Life | The Dedicated House | The Happy Housie | Restoration Redoux

Featured by:
Kammy's Korner
Real Housewives of Riverton

Wednesday, May 22, 2013

Secondhand Scores #10

When I was a kid my parents went to garage sales all the time.  I admit I was totally embarrassed by it.  I never really bothered going regularly until after I had my son.  I realized I could get clothes and toys and things for him for pennies on the dollar and that is when my love for secondhand was born.

Garage sales are my favorite but I also go to flea markets, thrift stores and auctions.  I am always on the hunt for furniture to paint, stuff for myself, my house, my kids and unique items that I could put to future use.  I love the thrill of finding something that was once very expensive for as little money as possible.


In this series, I will share my scores to show you how much you could get for your hard earned money.  Some days I hit jackpots, some days I get nothing, but I always have fun.


$$$$$$$$$$$$$$$$$$$$$$$$$$$$$$$$$$$$$$$$$$$$$$$$$$$$$$$$$$$$$$$$$$$$$$$$$$$$$$$$$$$$$$$$$$

Oh my goodness there were so many sales on Saturday.  Three different town-wide sales.  Look at this listing of sales...
This was for just ONE town!  There was no way to get to them all, but I sure tried! 


I picked up this desk from the first sale I went to.  It was $5 and I paid $3.  When I got it home I noticed it was in worse condition than I originally thought and will probably need more fixing than it was worth.  Note to self--do a better job inspecting!


I scored the Rubbermaid containers for $.25 each, the glasses cleaner for $.25, the food processor for $1 (I hope it works!) and bargained down the tiny crock pot warmer to $2.

And that was it!!!  I am happy with what I got and what I spent ($7 total).  Even though there were so many sales and tons of things to choose from at great prices, they were things I just didn't need or want.  


Linking to:
Green Willow Pond
The Real Housewives of Riverton
Southern Lovely
With A Blast
Beyond The Picket Fence 
The Shabby Creek Cottage
Mom On Timeout  
All Things With Purpose
I Gotta Create 
Domestic Superhero
House of Hepworths
Embracing Change
Crafty Scrappy Happy
A Peek Into My Paradise
The Shabby Nest
The Best Blog Recipes
Redoux
Miss Mustard Seed
Finding Fabulous  
Saving4Six
Funky Junk
I Heart Naptime 
Silver Pennies
Craft-O-Maniac
Dwellings 
I Should Be Mopping The Floor 
Homemaker On A Dime 
Life On Lakeshore Drive 
Classy Clutter 
Coastal Charm
Better With Age
Cozy Little House
My Uncommon Slice of Suburbia
Lolly Jane
Today's Creative Blog
Kammy's Korner
PJH Designs
twelveOeight
Kathe With An E
Elizabeth & Co.
Hickory Trail  
The Winthrop Chronicles
Not Just A Housewife 
Love Bakes Good Cakes
If It's Not Baroque...
The DIY Dreamer
Savvy Southern Style 
Fluster Buster 

Featured by:
Homemaker On A Dime  

Sunday, May 19, 2013

Posh Red Dressers

I have been wanting to paint something in Valspar Posh Red ever since seeing Picked & Painted redos in this color.  I picked up a sample pot and mixed it into homemade chalk paint to paint this dresser.  I painted the dresser with two coats of the red and started to distress it, but you really couldn't see it, so I skipped the step.


I chose to paint the top black because I didn't want it to be completely red. I had tried to sand the top down to stain, but I couldn't get it to come clean enough.


The trick with this color is to use some kind of glaze, stain or dark wax over it to make the color pop.  I used Martha Stewart's Metallic Glaze in Black Coffee.  I find this glaze to be very thick, but I applied it with cheese cloth and it was easier to work with.


I painted this next dresser the same color.


This piece was in deceptively poor condition.  Whoever stripped it must have used a belt sander with a very low grit.  All the raw wood was very rough and the top had tons of swirl marks.  I don't know if they gave up stripping when it came to the drawers and side panels, but that black paint was just flaking off.  I sanded the black paint as best I could and painted the entire piece with two coats of the Posh Red.  Instead of using the Martha Stewart glaze, this time I covered the paint with Minwax Dark Walnut stain.  I stained the top with it as well.  I like this technique, but it takes a long time to dry.


The top had some visible nail holes along the sides, so I used wood filler on them.  I couldn't cover it up with stain, so I painted two red stripes to hide them.  


I didn't mind the swirl marks on the stained wood as there already was a lot of detail in the wood grain.  I used AS dark wax only on the top and Minwax Finishing Paste on the rest of the body.


This red is a good color for my area (Eastern PA) since these pieces sold pretty quickly.  I think it looks like the Amish made furniture, but I charge a lot less than they do!


Linking to:
I Should Be Mopping The Floor
Coastal Charm
Better With Age
Craft-O-Maniac
Cozy Little House
Lolly Jane 
My Uncommon Slice of Suburbia 
The Rustic Pig
Today's Creative Blog 
Kammy's Korner
PJH Designs
Kathe With An E
Elizabeth & Co.
The Hickory Trail
Not Just A Housewife
twelveOeight
Silver Pennies
Homemaker On A Dime
If Its Not Baroque
The DIY Dreamer
Savvy Southern Style
Fluster Muster  
Not Done Growing
Green Willow Pond
The Real Housewives of Riverton
A Stroll Through Life
Southern Lovely
With A Blast
Beyond The Picket Fence 
The Shabby Creek Cottage
Mom On Timeout  
All Things With Purpose
I Gotta Create 
Domestic Superhero
House of Hepworths
Embracing Change
Crafty Scrappy Happy
A Peek Into My Paradise
The Shabby Nest
The Best Blog Recipes
Redoux
Miss Mustard Seed
Finding Fabulous 
Saving4Six 
Funky Junk 
Thrifty Decor Chick 

Featured by:
Cozy Little House
Elizabeth & Co.
Finding Fabulous
Green Willow Pond
The North End Loft

Wednesday, May 15, 2013

Secondhand Scores #9

When I was a kid my parents went to garage sales all the time.  I admit I was totally embarrassed by it.  I never really bothered going regularly until after I had my son.  I realized I could get clothes and toys and things for him for pennies on the dollar and that is when my love for secondhand was born.

Garage sales are my favorite but I also go to flea markets, thrift stores and auctions.  I am always on the hunt for furniture to paint, stuff for myself, my house, my kids and unique items that I could put to future use.  I love the thrill of finding something that was once very expensive for as little money as possible.


In this series, I will share my scores to show you how much you could get for your hard earned money.  Some days I hit jackpots, some days I get nothing, but I always have fun.


$$$$$$$$$$$$$$$$$$$$$$$$$$$$$$$$$$$$$$$$$$$$$$$$$$$$$$$$$$$$$$$$$$$$$$$$$$$$$$$$$$$$$$$$$$

It rained this past weekend so I was only able to go to two garage sales.

I scored these little measuring cups at one sale for $1.  I love old school kitchen items.  I have a wood cutting board that I am going to mount these on instead of the board that came with them.


I found a new indoor garage sale--or makeshift thrift shop.  This couple just bought a 12,000 square foot building in town and the second and third floors used to be an old theater that they are selling used items in.  The first floor is their living quarters and the fourth floor is the husband's karate studio. Pretty cool idea.  


They got a lot of people because of the rain washing out most garage sales, but there wasn't a lot of stuff for my use.  They did, however, have a five gallon paint bucket filled with hardware marked $.25 each.

Even though they were all the same handle, I had to get myself a bunch.  As I was digging for the nicest ones, I found two French provincial handles.  I scored 24 of the one style handle and the other two for $6.50 total.
It is so nice to get so many of the same style because it gives an option of changing out an entire piece's hardware instead of just the two at the top.


Linking to:
The Real Housewives of Riverton
Green Willow Pond 
Not Done Growing
Southern Lovely
Mom On Timeout
DIY By Design  
twelveOeight
Beyond The Picket Fence  
Embracing Change
The Shabby Creek Cottage  
Lamberts Lately
House of Hepworths 
I Gotta Create
All Things With Purpose
Domestic Superhero
Crafty Scrappy Happy
Miss Mustard Seed
The Shabby Nest
A Peek Into My Paradise
Lovely Crafty Weekend
Redoux
Finding Fabulous
Funky Junk
I Should Be Mopping The Floor
Coastal Charm
Better With Age
Craft-O-Maniac
Cozy Little House
Lolly Jane 
My Uncommon Slice of Suburbia 
The Rustic Pig
Today's Creative Blog
Kammy's Korner
PJH Designs
Kathe With An E
Elizabeth & Co.
The Hickory Trail
Not Just A Housewife
twelveOeight
Silver Pennies
Homemaker On A Dime
If Its Not Baroque
The DIY Dreamer
Savvy Southern Style
Fluster Muster 
Not Done Growing 

Sunday, May 12, 2013

Bayberry Green Milk Paint

I was able to get a free sample of Bayberry Green SafePaint (milk paint for walls) from The Old Fashioned Milk Paint Company.  The Weathered Door had a post on how she got the free sample and I immediately ordered one for myself.  I was going to post a link to the page where it said you can order a free sample, but they have since taken it down and now charge for one ounce samples--sorry!  

It was a eight ounce package of powder and I mixed up the entire thing because I didn't know how much I would need.  Well, turns out it is a LOT of milk paint!  I had to paint a bunch of things in it since the paint can't be stored for very long.

I started with this dresser.


I painted the body and drawers with two coats and did a wash on the top after I stained it.  I did that because the top was not in the best condition and I needed to cover up the issues.


I sanded the entire dresser with a medium grit sanding sponge to distress and smooth the paint.  The sanding brought out the wood grain in such a cool way.  I waxed with Minwax Finishing Paste.  


Next up was this corner shelf.


It got a rustic treatment with the color.  I only painted one coat and then distressed heavily.  


I waxed it with Minwax Finishing Paste and then moved onto this table that I got at the auction.


I sanded the top down and was able to stain it.  Which created my favorite combo of dark stained top and green body.  


This time the color was screaming Army Green to me and I wanted to add something to it that brought that out.  I settled on a stripe of Valspar Posh Red across the front. 


It was just the right little touch.  I distressed and waxed with Minwax Finishing Paste.

I still had more paint left so I painted this little table that I had from my parents.  It started out as a honey colored wood table.  I painted it with two coats, distressed and waxed.


I still had paint left, but didn't use it because I ran out of time to paint that weekend.  I hated to waste the paint, but to paint a dresser, shelf and two small tables with one free sample was pretty impressive.  


Even though it's milk paint, it is not the type to chip, like Miss Mustard Seed's paint, because it is made for walls.  The pricing is reasonable--comparable to latex, it goes on nicely (you just have to keep mixing it), dries very fast and smooth and is easy to distress.  It is very different to use than homemade chalk paint, but you get used to it.

Linking to:
Dwellings  
I Should be Mopping The Floors
Silver Pennies  
Life On Lakeshore Drive
Classy Clutter  
Homemaker On A Dime
Rain On A Tin Roof
Craft-O-Maniac
Coastal Charm
Cozy Little House
My Uncommon Slice of Suburbia
The Rustic Pig  
Lolly Jane
Kammy's Korner  
Today's Creative Blog
PJH Designs 
Not Just a Housewife
Hickory Trail
Elizabeth & Co.
If It's Not Baroque
Savvy Southern Style
DIY Dreamer  
Fluster Buster
The Real Housewives of Riverton
Green Willow Pond 
Not Done Growing
Southern Lovely
Mom On Timeout
DIY By Design
twelveOeight  
Beyond The Picket Fence 
Embracing Change 
The Shabby Creek Cottage 
Lamberts Lately 
House of Hepworths 
I Gotta Create
All Things With Purpose
Domestic Superhero
Crafty Scrappy Happy
Miss Mustard Seed
The Shabby Nest
A Peek Into My Paradise
Lovely Crafty Weekend
Redoux
Finding Fabulous
Funky Junk
Thrifty Decor Chick 

Featured by:
I Should Be Mopping The Floor  
Embracing Change
I Gotta Create