Saturday, December 29, 2012

Black Top Cheat

For this hutch, I would have loved to have had the top a stained wood, but I was not ready to take on the sanding or stripping process yet.  The next best thing (I thought) was to paint the top black to cheat the look of a stained top.
I painted it using homemade chalk paint.  The base is the Valspar paint sample with no color added.  The top is Valspar Lincoln Cottage Black.

I distressed it lightly and sprayed the hardware with Oil Rubbed Bronze and finished it with ASCP clear wax.
Sometimes you just have to make due with what you can handle.  I think it came out beautiful and added interest rather than being just one color.

Linking to:
i should be mopping the floor
Homemaker on a Dime 
Craft-O-Maniac
Debbiedoos
Southern Lovely
The Shabby Nest
Beyond the Picket Fence
Embracing Change
The DIY Dreamer
I Gotta Create
Miss Mustard Seed
The Shabby Nest  
Redoux
Wallis Farms Daily Walk

I was featured!
Classy Clutter 
Embracing Change
Power of Paint

Sunday, December 16, 2012

Easy Peasy

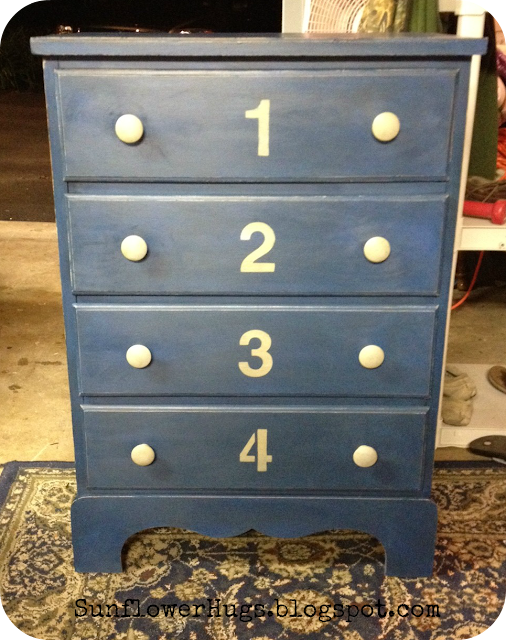
I found an alphabet stencil at one of those bargain closeout stores for less than $1!  They are 3" letters that look like an Arial font.  They also came with numbers and symbols.  Total score!
I had a small dresser to paint and when I got the stencil I immediately knew I wanted to use the numbers on it. 

I started with a base coat of Paris Grey.  I then painted it with 2 coats of the homemade chalk paint in Valspar Deep Sea Diving.

For the stencil and knobs I used the Paris Grey again and then distressed slightly.  I finished with a coat of AS clear and dark wax.  

Easy peasy lemon squeezy!

Linking to:
DIY Showoff
I Should Be Mopping The Floor
Homemaker on a Dime 
Craft-O-Maniac
Elizabeth&Co.
Crafty Texas Girls: Cowgirl Up!
Kathe With An E
{createinspire}
Coastal Charm
Primp
Southern Lovely
House of Hepworths
Embracing Change 
Miss Mustard Seed
Beyond the Picket Fence
Six Sisters Stuff
Classy Clutter  
Homemaker on a Dime
Lovely Crafty Home

I was featured!
Embracing Change
I Should Be Mopping The Floor
Cozy Little House

Sunday, December 9, 2012

My Version of DIY Chalk Paint

Annie Sloan Chalk Paint was definitely the reason I started to paint furniture, but it took a few months to start selling pieces and bring in money.  I had already invested quite a bit into the paint.  I bought five of the sample pots and 1 quart along with a can of clear and dark wax--almost $200!. 

While the quart of Paris Grey that I bought really went a long way, I don't want to paint everything Paris Grey.  I would like to have a variety of colors that I can afford to stock up on.

I had been checking other sites on what colors people have found to sell well (to potentially invest in another quart of ASCP) and what I found was more and more bloggers talking about DIY chalk paint. 

Elizabeth & Co.'s post about her recipe and her results is what gave me the confidence to try it.  Lowes has Valspar sample pots already mixed with colors and a bunch were on sale.  Along with the $6.78 box of plaster of paris, I picked up 3 pots of a color named Purple Stripe that was marked down to $1.47 each. 

I decided to try it on a small chair I picked up at a church sale. 
I followed Sharon's recipe and used a small Classico sauce jar that had ounce markings on the side so I could easily measure out one part plaster of paris to three parts paint.
I made sure I added the water to the plaster of paris first and then added the paint and shook it to mix.  I also added a little brown paint to tone down the color.

I started to paint the chair and I immediately noticed that the paint was thicker and covered much better in just one coat.   
After the second coat of paint I waxed it with clear and dark wax and added the crown stencil with ASCP Cream.  I slightly distressed it on the edges.  (I did notice it was harder to distress than ASCP.)  Not bad for my first try!

After some trial and error, I have perfected my recipe and love using it. 

  • 1 Heaping tablespoon of plaster of paris
  • 1 1/2 tablespoons of water
    • Mix in a bowl with a popsicle stick to a sour cream consistency
  • 8 ounces of paint
    • Pour plaster of paris mix directly into into the sample pot of paint 
    • Shake
    • Paint    

I almost always paint two coats and then sand the entire surface with a medium sanding sponge to make it smooth as silk and distress the paint.  This table was painted with Behr Outback and finished with clear and dark wax.
I prefer to distress at the edges and areas where the paint would normally wear off.  Or on the details of the piece to highlight them.  I love to see the transformation from the fully painted piece to the distressed look.
I still have some ASCP left and I use it here and there, but if I want a specific color, I will buy the sample pot of latex paint.  The normal price is $2.95 for eight ounces of paint and Home Depot will mix them into any color.

The best value for your money will always be oops paint. Home Depot sells the sample pot oops for $.50, quart oops for $2-$3 and gallon oops for $5-$7.  But you have to hope you like the oops paint color.

If you have a Sherwin Williams store in your area, their Color To Go is a great value if you want to have a specific color mixed.  It is $6.49 for 31 ounces.  Even though you have to buy more paint up front, it comes out to be half the price per ounce than Behr paint.


Linking to:

Elizabeth&Co. | DIY Showoff | I {Heart} Nap Time | Homemaker On A Dime | Craft-O-Maniac | Crafty Texas Girls: Cowgirl Up | I Should Be Mopping The Floor | Primitive&Proper | {Primp} | Southern Lovely | Beyond the Picket Fence | Embracing Change | Miss Mustard Seed | Redoux | Liz Marie | Too Much Time On My Hands | Six Sisters Stuff | Funky Junk Interiors

I was featured!
Cozy Little House

Saturday, December 1, 2012

Quart of Paris Grey

I had finally taken the plunge to go from the sample pot size to buying a quart of ASCP.  It took me way too long to decide on the color, but I picked Paris Grey.

It is no lie when they say a quart goes a long way!  I painted:
One coat on this quilt rack.

Two coats over Old White on this little accent table.

One coat over Cream on this end table.

Two coats on this mirror.

One coat on this gold mirror. (My little cutie snuck in the pic)

Two coats on the top of this table (Provence is on the bottom).

I also used it for the base coat on two other projects and two coats on a twin headboard/foot board project and still have a little less than half the can left!

Linking to:
DIY Project Parade
I Should Be Mopping The Floor
Primitive&Proper
Elizabeth&Co.
Primp
House of Hepworths  
Coastal Charm
Beyond the Picket Fence  
Shizzle Design
Miss Mustard Seed
Simple Home Life