My first little sample pot of ASCP was Versailles. I mentioned in my post about the cabinet I painted that I filled the paint pot back up with the water I was dipping the paint brush in. I made sure I got all the pigment that was at the bottom of my water cup thinking somehow I was getting more paint for my money.
This bright idea of mine did something to the paint. I painted two coats on a shelf with the Versailles and then sanded it for a slightly distressed look. When I started to wax it, the paint wiped off with the wax. Taking if from slightly distressed to a whole different level of distressed!
This is how it came out.
I was freaking out because it really was not the look I was going for. But I didn't want to paint it again. I just kept going with the clear wax, added a coat of dark wax and brought it in to sell at the consignment shop. The owner thought it was great and it sold a few weeks later. Go figure!
Linking to:
Primitive & Proper
Elizabeth&Co.
Under The Table and Dreaming
Liz Marie Blog
Embracing Change
Beyond the Picket Fence
Primp
Tuesday, November 20, 2012
Friday, November 9, 2012
Glue as a Crackle Medium
For a while I found myself slightly addicted to Pinterest. There were just so many interesting pins out there and I had to pin them all the time. The bad thing was that I wasn't actually doing any of the pins.
I made a point to try some of the pins and one of them was using Elmer's Glue as a crackle medium that I found on Make The Best of Things blog. She did a lot of experiments of different materials and colors and paints and how she applied the glue that I was very inspired to try it out.
I had these 2 very modern looking shelves I got at GoodWill that I was willing to try this technique on. I thought the modern mixed with the rustic crackle would be an interesting twist.
Linking to:
Classy Clutter
Primitive & Proper
Elizabeth&Co.
DIY Showoff
Miss Mustard Seed
I made a point to try some of the pins and one of them was using Elmer's Glue as a crackle medium that I found on Make The Best of Things blog. She did a lot of experiments of different materials and colors and paints and how she applied the glue that I was very inspired to try it out.
I had these 2 very modern looking shelves I got at GoodWill that I was willing to try this technique on. I thought the modern mixed with the rustic crackle would be an interesting twist.
I gave them one coat of ASCP Versailles first. When it was dry I applied the glue with a foam brush to all the tops of the shelf.
The first coat of the painted glue area was done and I rested the shelf on a little bit of an angle and the glue and paint gravitated in the direction of how it was resting. I wasn't really happy with the way that came out, but it did let a lot of the green show through. If you are going to use this technique, make sure your piece is laid down flat so the glue and the paint can't run and make your crackle wavy.
I apologize for the terrible after photo, but I was really not happy with how they came out.
I did work on another crackle project that I have a better photo of. I used orange craft paint for the base (about 5 coats) and black latex paint over the glue. I didn't water down the glue, just painted it on kind of thick and painted the black on top after waiting maybe a minute. This crackled really nicely and I was much happier.
I stocked up on glue at a recent flea market (5 bottles for $1), so I will have to try it out again soon.
Linking to:
Classy Clutter
Primitive & Proper
Elizabeth&Co.
DIY Showoff
Miss Mustard Seed
Wednesday, November 7, 2012
Drop Cloths for Slipcovers
When my father moved he gave me an awesome sleeper sofa that he couldn't take with him. My parents bought it in 1997 when they first moved to Georgia and it has the BEST mattress. I had slept on it many times during my visits and it is as comfortable as a regular bed!
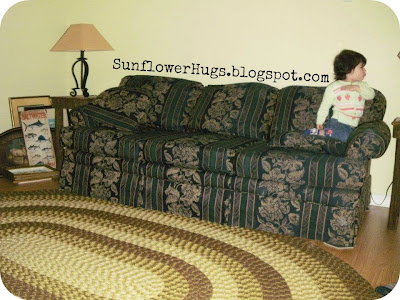
Here is the couch with my little cutie. We were still in the middle of decorating the den when I got the couch. I didn't love the fabric, but I was willing to live with it.
Then I found this amazing braided rug at a garage sale. I love this rug! I actually passed it up and left the sale and then drove back as fast as I could once I realized what a deal it was.
As you can see, it does not go with the couch at all. Pinterest to the rescue! Once again I spent FOREVER researching how best to do this and I finally found a six part video tutorial on how to make drop cloth slip covers by Miss Mustard Seed.
You will need the following supplies:
I washed the drop cloths at the laundromat before I started. You don't want to make the cover and then wash it because the fabric shrinks and it won't fit.
I just followed Miss Mustard Seed's tutorials (going back to them whenever I got stuck) and did it step by step, one section at a time. It did take quite a while to get it done, but I wouldn't say it was hard. It just required a lot of patience. I probably spent more time pinning the fabric than sewing it.
The trickiest part was attaching the arms to the back, front and the sides at the same time. I kept trying to follow the exact shape of the couch, but it wasn't necessary. The look of the drop cloth is supposed to be casual and not perfect.

Elizabeth&Co.
Embracing Change
Primp
Red Hen Home
Beyond the Picket Fence
Redoux
Miss Mustard Seed
Liz Marie
Funky Junk Interiors
Here is the couch with my little cutie. We were still in the middle of decorating the den when I got the couch. I didn't love the fabric, but I was willing to live with it.
Then I found this amazing braided rug at a garage sale. I love this rug! I actually passed it up and left the sale and then drove back as fast as I could once I realized what a deal it was.
As you can see, it does not go with the couch at all. Pinterest to the rescue! Once again I spent FOREVER researching how best to do this and I finally found a six part video tutorial on how to make drop cloth slip covers by Miss Mustard Seed.
You will need the following supplies:
- A sewing machine
- Enough drop cloths to cover your couch
- I bought four 15'x4' 10 oz canvas drop cloths from Lowes (I had some leftover)
- Matching thread
- Fabric scissors
- A million pins (the ones with the big plastic heads)
- A seam ripper
I washed the drop cloths at the laundromat before I started. You don't want to make the cover and then wash it because the fabric shrinks and it won't fit.
I just followed Miss Mustard Seed's tutorials (going back to them whenever I got stuck) and did it step by step, one section at a time. It did take quite a while to get it done, but I wouldn't say it was hard. It just required a lot of patience. I probably spent more time pinning the fabric than sewing it.
The trickiest part was attaching the arms to the back, front and the sides at the same time. I kept trying to follow the exact shape of the couch, but it wasn't necessary. The look of the drop cloth is supposed to be casual and not perfect.

I think it came out AMAZING! Now the rug goes with the couch and the whole look of the room is totally my and my husband's taste. I am definitely a beginner at sewing and I would say as long as you have some experience with a sewing machine (even if it was from 10 years prior when you just hemmed a few pairs of pants) then you could totally do this too.
Linking to
Primitive & ProperElizabeth&Co.
Embracing Change
Primp
Red Hen Home
Beyond the Picket Fence
Redoux
Miss Mustard Seed
Liz Marie
Funky Junk Interiors
Thursday, November 1, 2012
Painting and Selling
I go to garage sales every weekend during the spring/summer. I have been buying toys and clothes for the kids, various home decor and sometimes tools for my husband. Since I discovered chalk paint, I now buy small furniture pieces that I have passed up all this time since I didn't know I could paint them (and eventually sell them).
My next furniture find that I painted were these two sorry looking chairs.
I found a really nice fabric from the remnant pile in Hobby Lobby and from there decided on Duck Egg Blue distressed with clear and dark wax.
As my 2 year old daughter would say: Ta Da!!!
The chair on the bottom is the one I took with me to the consignment store where I now sell my painted pieces. I was beyond nervous to go in and ask if they would take the chair, but I was inspired by Miss Mustard Seed's story of how she started and I forced myself to go in and ask. You can't fail if you don't even try!
I showed the owner the chair and she was so excited. She had just opened that month and said this was exactly what she was looking for to add to her store. She took the chair immediately and asked that I bring the other chair and cabinet in right away.
I now bring her a piece every other week and so far things are selling pretty well. I was able to sell the cabinet (the piece that started it all), but the two chairs are still waiting to find a home. Hopefully they will soon. They really are SO pretty in person.
Linking to
Embracing Change
Elizabeth&Co.
Classy Clutter
504 Main
I was featured!
Embracing Change
My next furniture find that I painted were these two sorry looking chairs.
I found a really nice fabric from the remnant pile in Hobby Lobby and from there decided on Duck Egg Blue distressed with clear and dark wax.
As my 2 year old daughter would say: Ta Da!!!
I showed the owner the chair and she was so excited. She had just opened that month and said this was exactly what she was looking for to add to her store. She took the chair immediately and asked that I bring the other chair and cabinet in right away.
I now bring her a piece every other week and so far things are selling pretty well. I was able to sell the cabinet (the piece that started it all), but the two chairs are still waiting to find a home. Hopefully they will soon. They really are SO pretty in person.
Linking to
Embracing Change
Elizabeth&Co.
Classy Clutter
504 Main
I was featured!
Embracing Change
Subscribe to:
Posts (Atom)


