Sunday, October 20, 2013

Pretty Green Storage Bench

My husband is at it again!  First he painted a chest and dresser and then he painted sports theme pieces.  This time he painted this Pier One storage bench.
It already had a distressed look, but then it had some damaged areas and needed to be tightened up.

He painted it with two coats of Behr Outback green mixed into homemade chalk paint, lightly distressed and waxed with Minwax Finishing Paste.
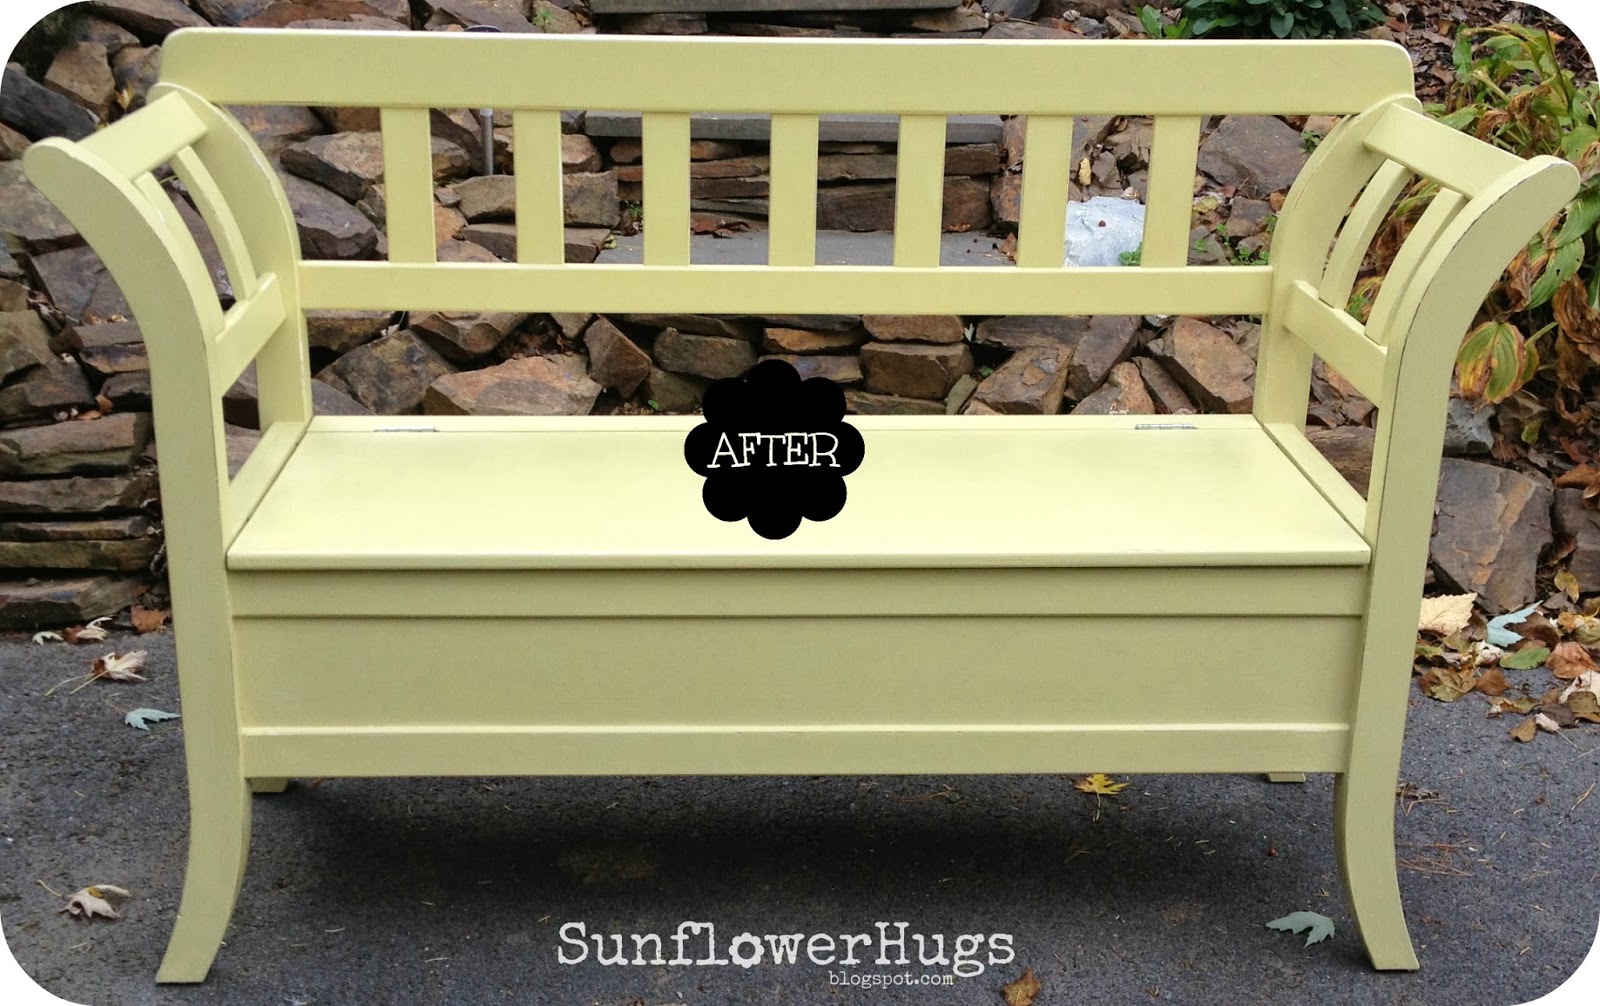
It is such a light and happy color green.  Didn't he do a great job?
Linking to:
DIY Showoff | Silver Pennies | Craft-O-Maniac | I Should Be Mopping The Floor | Creative Home Expressions | Dwellings | Pink When | Rain On A Tin Roof | Homecoming | The Dedicated House | Coastal Charm | Cozy Little House | A Stroll Through Life | Love Grows Wild | Table For Seven | Kammy's Korner | VMG206 | Not Just A Housewife | The Winthrop Chronicles | Elizabeth & Co. | The DIY Dreamer | Ella Claire | Savvy Southern Style | Fluster Buster | Polka Dots On Parade | The Real Housewives of Riverton | The Happy Housie | Lamberts Lately | Sweet Haute | Saving 4 Six | Start At Home | I Gotta Create | Domestic Superhero | Living Well Spending Less | Redoux Interiors | The Thrifty Groove | Liz Marie | The Shabby Nest | Miss Mustard Seed | The Pin Junkie | Lovely Crafty Home | Remodelaholic | One Project Closer | Today's Creative Blog | DIY Vintage Chic | Funky Junk Interiors | Too Much Time On My Hands | Classy Clutter | Twigg Studios

Featured by:
Too Much Time On My Hands
One Project Closer

Wednesday, October 16, 2013

Secondhand Scores #24

When I was a kid my parents went to garage sales all the time.  I admit I was totally embarrassed by it.  I never really bothered going regularly until after I had my son.  I realized I could get clothes and toys and things for him for pennies on the dollar and that is when my love for secondhand was born.

Garage sales are my favorite but I also go to flea markets, thrift stores and auctions.  I am always on the hunt for furniture to paint, stuff for myself, my house, my kids and unique items that I could put to future use.  I love the thrill of finding something that was once very expensive for as little money as possible.


In this series, I will share my scores to show you how much you could get for your hard earned money.  Some days I hit jackpots, some days I get nothing, but I always have fun.


$$$$$$$$$$$$$$$$$$$$$$$$$$$$$$$$$$$$$$$$$$$$$$$$$$$$$$$$$$$$$$$$$$$$$$$$$$$$$$$$$$$$$$$$$$


The past few weeks there have only been a handful of garage sales.
  • Small framed art for $.50
    • To be turned into a chalkboard
  • Box of rubber gloves for $4
    • To use when staining and waxing furniture
  • Twig pumpkin for $.25
  • Practically brand new LL Bean Boat and Tote bag for $.50
    • I LOVE these bags and have only found one other in the past in much worse condition
  • Wood sign for $.10
    • I will paint over it to make a more updated sign
  • Two knife blocks and knives for $1
  • Pfaltzgraff sugar and creamer set for $2
    • I am using the sugar pot to store salt by my stove
  • Brayer $.25
  • Bag of five Rit dyes $1.50
  • Mounted sword for $3
    • I got this for my son to hang in his room--he really wants to take it off the mount and use it though!
  • Poinsettia shower curtain hooks $.25
  • Alarm clock $1.50
  • Wood wall art was free
    • I plan to paint over this to either make a sign or a chalkboard
I have painted a bunch of the artwork, that I have gotten at the garage sales this summer, to make chalkboards.  I usually do a few at at time while I have the black paint out.  
I added the chalk art (done with the help of my overhead projector) to hopefully help sell them faster.  **The Laundry one is the artwork I got at the top of this post.

Sunday, October 13, 2013

Black & White Desk

It really is amazing what a little paint can do.  This desk looked like it had been completely neglected for years.
But two coats of black on the top and two coats of white on the body (both in homemade chalk paint), lightly distressed, waxed with Minwax Finishing Paste and look at what it became!
Oil rubbed bronze spray paint for the pulls and glass knob for the center drawer completes the makeover.

I just love painted (and painting) furniture!

Linking to:
DIY Showoff | Silver Pennies | Craft-O-Maniac | I Should Be Mopping The Floor | Creative Home Expressions | Dwellings | Pink When | Rain On A Tin Roof | Homecoming | The Dedicated House | Coastal Charm | Cozy Little House | A Stroll Through Life | Love Grows Wild | Table For Seven | Kammy's Korner | VMG206 | Not Just A Housewife | The Winthrop Chronicles | Elizabeth & Co. | The DIY Dreamer | Ella Claire | Savvy Southern Style | Fluster Buster | Dagmar's Home | Polka Dots On Parade | The Real Housewives of Riverton | The Happy Housie | Shabby Creek Cottage | Lamberts Lately | Sweet Haute | Saving 4 Six | Start At Home | I Gotta Create | Domestic Superhero | Living Well Spending Less | Redoux Interiors | The Thrifty Groove | Liz Marie | The Shabby Nest | Miss Mustard Seed | Today's Creative Blog | DIY Vintage Chic | Funky Junk Interiors | Too Much Time On My Hands 

Sunday, October 6, 2013

Pressboard Dresser

One of my neighbors stopped by when I was painting furniture in my garage.  He said he had an old dresser to offer to me.  He did mention it was pressboard and I tried to politely decline, but he really wanted to give it to me.
He and his son walked it over a few days later.  I was actually surprised it was in French Provincial style. The hardware was really nice!  Upon closer inspection though, the top and one side had a lot of the telltale pressboard bubbling.  

I didn't want to get rid of the dresser because it was structurally in good condition (it also weighed a ton), but I was stumped as to how to hide the bubbling.  I decided to try to distract the eye from the bubbling with some kind of painting technique.

First I painted it with two coats of SW paint in their base white mixed into homemade chalk paint.  I then took a small container and poured in a little bit of SW Seaworthy and added a lot of water to it (about a 3 to 1 ratio of water to paint).  

I then used a 4" wide chip brush to add the watered down paint across one of the drawers.  I wiped left to right, then up and down, then left and right again.  Not sure if that was necessary, but I liked the result and repeated it on all drawers and the body of the dresser.

Here's how it came out.
I think it kind of looks like a denim treatment--or maybe linen?  Or is more like a white washed look?  Either way I really like how it came out. I also switched out the hardware for ones I spray painted a bright white.  
There was an extra handle in the middle of the top drawer and since I didn't know I was going to change the hardware before I started painting, I didn't fill the holes.  I used little wood appliques I got from Michaels. I painted them white and glued them on with Aleene's Tacky glue to cover the holes.  

I distressed the edges and finished it with Minwax Finishing Paste.  You can still see the bubbling (although not in the photos I took), but it didn't look too bad--it gave a little character.
  

Linking to:
Silver Pennies | DIY Showoff  | Dwellings | Craft-O-Maniac | Coastal Charm | The Dedicated House | Rain On A Tin Roof | Homecoming | Cozy Little House | Love Grows Wild | Kathe With An E | Kammy's Korner | Table 4 Seven | Elizabeth & Co. | The Winthrop Chronicles | Not Just A Housewife | The DIY Dreamer | Savvy Southern Style | Polka Dots On Parade | Fluster Buster | The Real Housewives of Riverton | Ella Claire | The Blissful Bee | Shabby Creek Cottage | Lamberts Lately | Start At Home | Sweet Haute | Saving 4 Six | Too Much Time On My Hands | Dagmar's Home | DIY Vintage Chic | The Dedicated House | Classy Clutter | Life On Lakeshore Drive | VMG206

Featured by:
The Dedicated House
Kammy's Korner

Sunday, September 29, 2013

Easy Bench Makeover

Sometimes I like a challenge, but sometimes I just want an easy and quick project for instant gratification.  I knew this bench would be it!
I once read that a pillow sham is the perfect size piece of fabric to recover a chair seat, so last summer I picked up three of these shams at GoodWill for a few dollars.
They are Martha Stewart Living brand and are a nice heavyweight fabric.  It was also just the right size for this bench.  

I started by removing the blue and white fabric from the bench seat to find this underneath--
A chenille rug!!  And that was it, no padding or anything else.  Thankfully I had some batting that I was able to layer to give the seat some cushion.  

Then I took apart the sham.  I cut off the back layer of fabric as well as the piping to be able to free the top of the fabric.  I stapled it to the seat top as you would any seat cover.

I almost threw away the piping, but realized it was long enough to go around the seat--I just stapled it around the edges.  It was so easy and added a nice finished touch to the seat.

Not sure if you can tell, but the bench used to have cross bars--only one was left.  I used a hand saw and cut it off then sanded and filled the holes with wood filler. I painted the base with three coats of DIY chalk paint in Valspar Hotel Churchill Vanilla, distressed the paint and then screwed the seat back onto the base.
Voila!  There it is, instant gratification with a wonderfully transformed bench.


Linking to:
Silver Pennies | DIY Showoff | I Should Be Mopping The Floor | Dwellings | The Dedicated House | Creative Home Expressions | Twigg Studios | Coastal Charm | Rain On A Tin Roof | Homecoming | The Dedicated House | Cozy Little House | A Stroll Through Life | Love Grows Wild | Kammy's Korner | Table 4 Seven | Domestic Superhero | The Happy Housie | Living Well Spending Less | Lamberts Lately | Fluster Buster | Sweet Haute | Start At Home |  I Gotta Create | The Shabby Creek Cottage | Craft Dictator | Miss Mustard Seed | Liz Marie | The Shabby Nest | DIY Vintage Chic | Lovely Crafty Home | The Pin Junkie | Pink When |

Featured by:
Creative Home Expressions