Pages

Sunday, November 17, 2013

Mod Podge Graphic Transfer

I finally tried the Mod Podge graphic transfer technique! I would not say it was a difficult technique, it just requires a little patience. 
I chose to do it on this little table I got last year for $4. I started by stripping the top and then staining it with AS dark wax.  I then painted the whole thing with a coat of SW base paint of white mixed into homemade chalk paint.  Next I painted just the body with an oops paint that looked like AS Louis Blue.  I left the drawer white so I could add the graphic.
I used this hotel sign from The Graphics Fairy. I went by Creative Carmella's tutorial to add the graphic with Mod Podge.
I LOVE the way it came out! The glass knob was the icing on the cake. I definitely think it is something I will try again. 


Linking to:
DIY Showoff | Silver Pennies | Craft-O-Maniac | I Should Be Mopping The Floor | Creative Home Expressions | Dwellings | Pink When | Rain On A Tin Roof | Homecoming | The Dedicated House | Coastal Charm | Cozy Little House | A Stroll Through Life | Love Grows Wild | Table For Seven | Kammy's Korner | VMG206 | Not Just A Housewife | The Winthrop Chronicles | Elizabeth & Co. | The DIY Dreamer | Art Is Beauty | Ella Claire | Savvy Southern Style | Fluster Buster | Polka Dots On Parade | The Real Housewives of Riverton | The Happy Housie | Lamberts Lately | Sweet Haute | Saving 4 Six | Start At Home | I Gotta Create | Domestic Superhero | Living Well Spending Less | One More Time Events | Redoux Interiors | The Thrifty Groove | Liz Marie | The Shabby Nest | Miss Mustard Seed | The Pin Junkie | Craft Dictator | Crafty Allie | Lovely Crafty Home | Remodelaholic | One Project Closer | Today's Creative Blog | DIY Vintage Chic | Funky Junk Interiors | Too Much Time On My Hands 

Sunday, November 10, 2013

Army Green Dresser

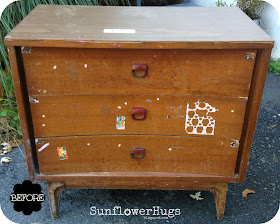
I got this dresser for $3 from a thrift store that was closing down.  Structurally it was in good condition, but those stickers gave me a hard time.
I used a hair dryer to soften the stickers and got them off with a plastic scraper.  I had to hold the hair dryer about an inch away from the stickers to get it to work. I then used rubbing alcohol to remove the residue.

Then, after much consideration, I chose to paint it in an oops paint that I have had for a while.  I have an entire gallon of it and it looks pretty scary in the can so I never used it before.  
See what I mean? I took a chance and painted it with two coats mixed into homemade chalk paint. Turns out the color is pretty amazing!
I distressed it with a medium grit sanding sponge and it brought out so much dimension to the paint.  It is very subtle in the photos, but it is there and it is awesome!

And because I always distress, I left the imperfections of the dresser instead of filling with wood putty for two reasons. 1) I think it adds character, it is not meant to be perfect. 2) I would not have been able to make a perfect repair anyway.
I think the color came out exactly like army green! I painted the red stripe and numbers to add to the theme.
The hardware was crazy dirty and painted with red nail polish. The way I clean all hardware is by soaking it in ammonia. Susan from Uniquely Yours...Or Mine recommended it and it has wonderful results!

I put the hardware in an glass jar and then fill enough ammonia to cover the hardware and let it soak overnight. Make sure to put a cover on because it stinks! I took them out and the nail polish just rinsed off with water (it will also melt paint off). 

I then polished them with a scrubby sponge to remove the tarnish and they come out so shiny and happy! Some hardware doesn't come out that shiny. In those cases I either spray paint it or use Rub n' Buff.
Linking to:
DIY Showoff | Silver Pennies | Craft-O-Maniac | I Should Be Mopping The Floor | Creative Home Expressions | Dwellings | Pink When | Rain On A Tin Roof | Homecoming | The Dedicated House | Coastal Charm | Cozy Little House | A Stroll Through Life | Love Grows Wild | Table For Seven | Kammy's Korner | VMG206 | Not Just A Housewife | The Winthrop Chronicles | Elizabeth & Co. | The DIY Dreamer | Art Is BeautyElla Claire | Savvy Southern Style | Fluster Buster | Polka Dots On Parade | The Real Housewives of Riverton | The Happy Housie | Lamberts Lately | Sweet Haute | Saving 4 Six | Start At Home | I Gotta Create | Domestic Superhero | Living Well Spending Less | One More Time Events | Redoux Interiors | The Thrifty Groove | Liz Marie | The Shabby Nest | Miss Mustard Seed | The Pin Junkie | Craft Dictator | Crafty Allie | Lovely Crafty Home | Remodelaholic | One Project Closer | Today's Creative Blog | DIY Vintage Chic | Funky Junk Interiors | Too Much Time On My Hands 

Sunday, November 3, 2013

5' Long French Country Coffee Table

I lucked out and scored this huge coffee table with two end tables for $10 total at a garage sale in July!
The top had a small damage spot in the middle so I stripped it with Citristrip.  There was just a thin coat of varnish that melted right off.

I painted over the horrible yellow and gold paint with two coats of homemade chalk paint in white.  After it dried, there was some bleed through so I painted a third coat in SW Essential Grey. I didn't mix it into chalk paint since there was already two coats as a base.
To bring out all the detail in the table, I used Martha Stewart metallic glaze in Black Coffee--I love this glaze!  I used a foam brush to push it into all the lines and then wiped it away with a wet rag. 
The table had such amazing details that would have been lost if I did not glaze it.
I actually painted and glazed the entire table upside down.  It looked so different to me once I turned it over!  I sealed the paint and glaze with Minwax Wipe-On Poly.  It is much better to use this when there is a lot of detail as it would have been too hard to buff out wax.
For the top, after I stripped the old finish, I didn't want to stain this incredible wood.  I just put a coat of coconut oil to brighten it up and then sealed it with both Minwax Wipe-On Poly and Finishing Paste.  I added the finishing paste because the wipe-on poly looked streaky to me.  After I buffed it, the top was perfect!
I was really happy with how it came out.  


Linking to:
DIY Showoff | Silver Pennies | Craft-O-Maniac | I Should Be Mopping The Floor | Creative Home Expressions | Dwellings | Pink When | Rain On A Tin Roof | Homecoming | The Dedicated House | Coastal Charm | Cozy Little House | A Stroll Through Life | Love Grows Wild | Table For Seven | Kammy's Korner | VMG206 | Not Just A Housewife | The Winthrop Chronicles | Elizabeth & Co. | The DIY Dreamer | Ella Claire | Savvy Southern Style | Fluster Buster | Polka Dots On Parade | The Real Housewives of Riverton | The Happy Housie | Lamberts Lately | Sweet Haute | Saving 4 Six | Start At Home | I Gotta Create | Domestic Superhero | Living Well Spending Less | One More Time EventsRedoux Interiors | The Thrifty Groove | Liz Marie | The Shabby Nest | Miss Mustard Seed | The Pin Junkie | Craft Dictator | Crafty AllieLovely Crafty Home | Remodelaholic | One Project Closer | Today's Creative Blog | DIY Vintage Chic | Funky Junk Interiors | Too Much Time On My Hands 

Featured by:
One More Time...Events
So Much Better With Age
Sweet Haute